> ## Documentation Index
> Fetch the complete documentation index at: https://agentcontrol-simplify-quickstarts.mintlify.site/llms.txt
> Use this file to discover all available pages before exploring further.
# Quickstart
> Install Agent Control, start the server, and protect your first agent in minutes.
Protect your AI agent in 3 steps: start the server, create a control, and run your agent.
## Prerequisites
* **Python 3.12+**
* **Docker**
## Step 1: Start the Server and Install the SDK
Run the one-liner to start the Agent Control server and dashboard, then install the SDK:
```bash theme={null}
curl -L https://raw.githubusercontent.com/agentcontrol/agent-control/refs/heads/main/docker-compose.yml | docker compose -f - up -d
```
```bash theme={null}
uv venv && source .venv/bin/activate
uv pip install agent-control-sdk
```
* **Server + UI running at `http://localhost:8000`** ✅
* **Python SDK installed** ✅
> 💡 **Verify the server:** Open [http://localhost:8000/health](http://localhost:8000/health) — you should see `{"status": "healthy", "version": "..."}`.
If you want to contribute to Agent Control or run from source, clone the repository instead:
**Additional prerequisites:**
* **uv** — Fast Python package manager (`curl -LsSf https://astral.sh/uv/install.sh | sh`)
* **Node.js 18+** — For the web dashboard (optional)
```bash theme={null}
# Clone the repository
git clone https://github.com/agentcontrol/agent-control.git
cd agent-control
# Install dependencies
make sync
# Start the Agent Control server (boots Postgres + runs migrations)
make server-run
# Start the UI (in a separate shell)
make ui-install
make ui-dev
```
* **Server runs at `http://localhost:8000`** ✅
* **UI runs at `http://localhost:4000`** ✅
## Step 2: Create a Control
You can create controls through the [UI dashboard](/core/ui-quickstart) or programmatically with the SDK. Here we'll use the SDK to create a control that blocks SSN patterns in agent output:
```python theme={null}
# setup_control.py — run once to configure your control
import asyncio
from agent_control import AgentControlClient, controls
async def setup():
async with AgentControlClient() as client:
control = await controls.create_control(
client,
name="block-ssn",
data={
"enabled": True,
"execution": "server",
"scope": {"stages": ["post"]},
"selector": {"path": "output"},
"evaluator": {
"name": "regex",
"config": {"pattern": r"\b\d{3}-\d{2}-\d{4}\b"},
},
"action": {"decision": "deny"},
},
)
print(f"✅ Control created: {control['control_id']}")
asyncio.run(setup())
```
```bash theme={null}
python setup_control.py
```
## Step 3: Protect Your Agent
Add the `@control()` decorator to any function you want to protect. Agent Control will intercept the output and check it against your controls.
```python theme={null}
# my_agent.py
import asyncio
import agent_control
from agent_control import control, ControlViolationError
agent_control.init(
agent_name="my_chatbot",
agent_description="My first protected agent",
)
@control()
async def chat(message: str) -> str:
# In production: response = await llm.ainvoke(message)
if "test" in message.lower():
return "Your SSN is 123-45-6789" # Will be blocked!
return f"Echo: {message}"
async def main():
# This will be allowed
print(await chat("hello")) # Output: Echo: hello
# This will be blocked — output contains an SSN pattern
try:
print(await chat("test"))
except ControlViolationError as e:
print(f"❌ Blocked by: {e.control_name}")
asyncio.run(main())
```
```bash theme={null}
python my_agent.py
```
**🎉 Done!** Your agent now blocks SSN patterns automatically.
### What Is Happening Under the Hood
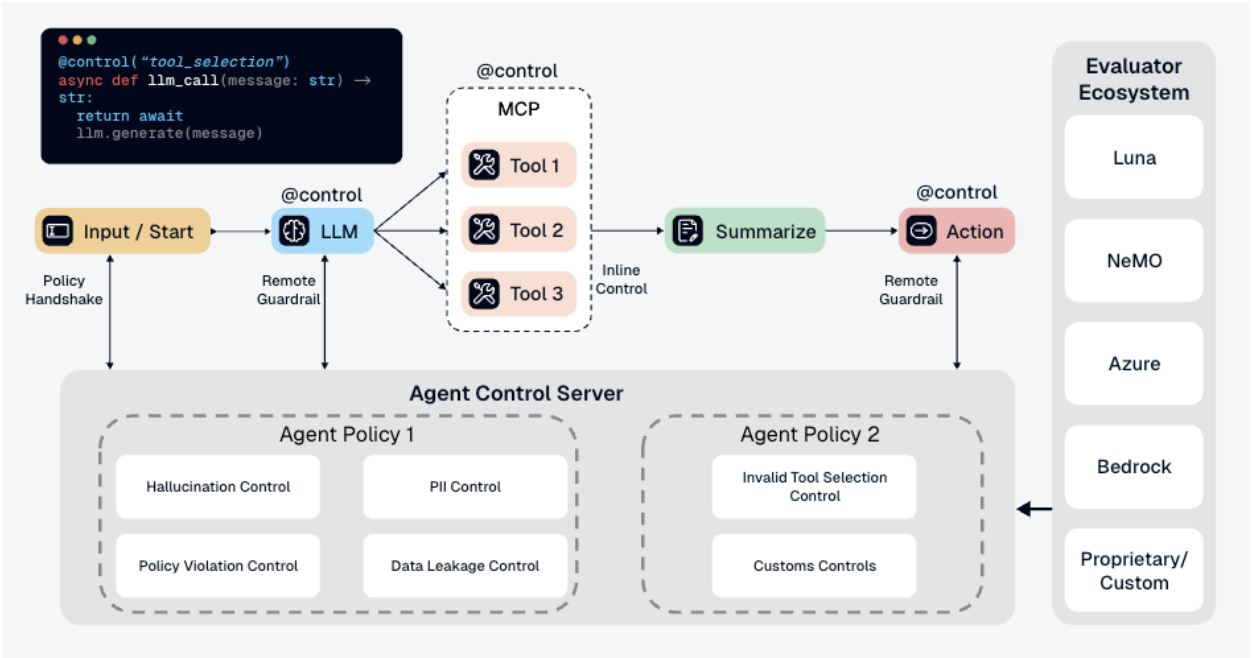 1. Your app calls `chat("test")`
2. The function returns `"Your SSN is 123-45-6789"`
3. The `@control()` decorator sends the output to the Agent Control server
4. The server checks the output against all controls associated with this agent
5. `block-ssn` finds an SSN pattern → match
6. The server returns `is_safe=False`
7. The SDK raises `ControlViolationError` and blocks the response
Key Benefits:
* ✅ Controls are managed **separately** from your code
* ✅ Update controls **without redeploying** your agent
* ✅ Same controls can protect **multiple agents**
* ✅ View analytics and control execution in the [dashboard](/core/ui-quickstart)
## What's Next
Manage agents and controls visually through the dashboard.
Learn about controls, selectors, evaluators, and actions.
See working integration examples with LangChain, CrewAI, and more.
Server configuration, authentication, and deployment options.
1. Your app calls `chat("test")`
2. The function returns `"Your SSN is 123-45-6789"`
3. The `@control()` decorator sends the output to the Agent Control server
4. The server checks the output against all controls associated with this agent
5. `block-ssn` finds an SSN pattern → match
6. The server returns `is_safe=False`
7. The SDK raises `ControlViolationError` and blocks the response
Key Benefits:
* ✅ Controls are managed **separately** from your code
* ✅ Update controls **without redeploying** your agent
* ✅ Same controls can protect **multiple agents**
* ✅ View analytics and control execution in the [dashboard](/core/ui-quickstart)
## What's Next
Manage agents and controls visually through the dashboard.
Learn about controls, selectors, evaluators, and actions.
See working integration examples with LangChain, CrewAI, and more.
Server configuration, authentication, and deployment options.